


At the end of this article, you should:
Know what a RESTful API is
Be able to build a RESTful Blogging API with ExpressJS
Be acquainted with packages that are used in building, maintaining, and securing an API
Know how to test your API
Know examples of apps you can deploy your API on
What is RESTful API
According to redhat.com, an API is a set of definitions and protocols for building and integrating application software. In simple terms, it is a set of instructions that guides how two computer systems exchange information securely over the internet or something like a middleman between users and the resources or web services they want to get. To make an API RESTful is to make it conform to the constraints of REST architectural style and allow for interaction with RESTful web services. You can see the criteria for REST (Representational State Transfer) here.
Before Building an API
It is easy to hit the ground running on whatever IDE (Independent Development Environment) you choose. However, it is better to have a written vision of what you are about to build so you don't hit the rocks almost as soon as you start. Before you start, step back and ask yourself these questions: What do I want to build? Who am I building for? What features are necessary to make it easy to use for the set of people I'm building for? How do I set up authentication and authorization? What do I do to ensure my code is scalable, maintainable, and secure?
The answers to these questions should birth a well-written (online or offline) plan for the API to be built, showing clearly where to start and what to do at each point before production. In all of these, be mindful of test-driven development.
In this article, we will be building NodeJs RESTful API with the help of ExpressJS and a ton of other npm packages. Install NodeJS on your local machine from https://nodejs.org/en/. We will also be using MongoDB as our database, you can create an account if you haven't got one.
Let's Get Coding code👩🏽💻...3
Create the project folder on your desktop or in any other folder you’ll like the project to be in, call it blogging-API (or any other name you wish to call it).
$ mkdir blogging-api
$ cd blogging-api
Run the following command inside the folder to initialize the project as a node project:
$ npm init -y
The command above creates a file called package.json (something like a manifest for the project). The flag -y in the command above allows you initialize the node project using the default parameters.
Now is the time to create the other files that will be used in the API. We will be using the MVC architecture pattern which enables separation of concerns, thereby making the code very manageable. By the time we are done with this project, your file structure will look like below 👇🏽
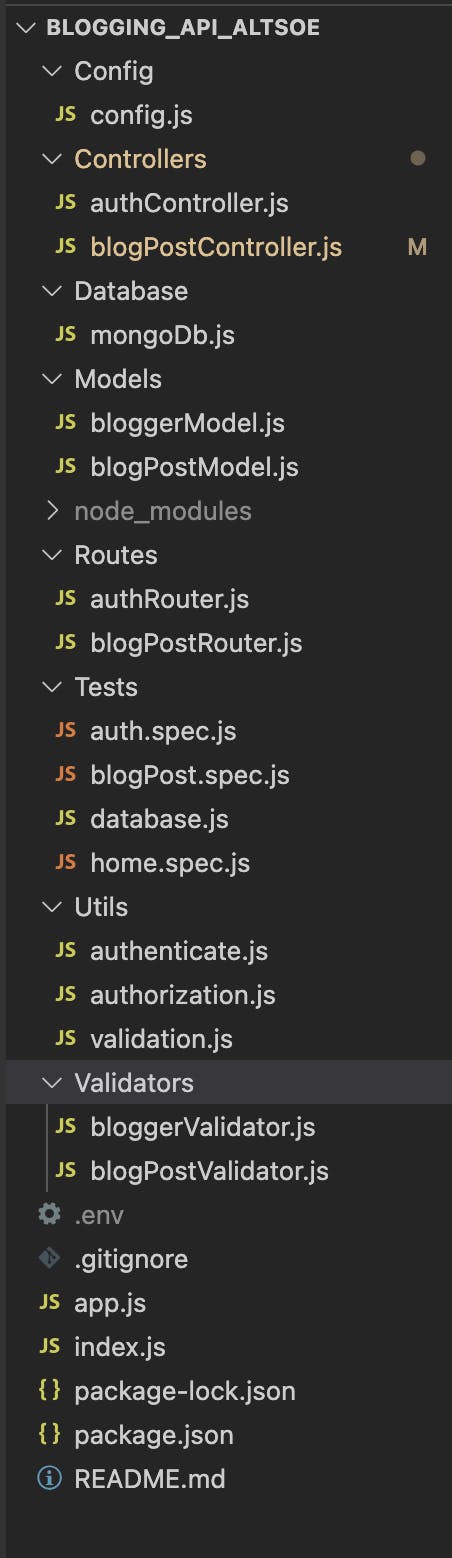
You will get to understand what each file is for as we go on.
After setting up our Node project, we install four packages to start with.
Run the following command in your terminal to automatically create package-lock.json and node_modules files.
$ npm install express dotenv mongoose body-parser
In your .gitignore file, type the following:
node_modules
.env
In your .env file, type the following while inserting your choice port number and the link to your MongoDB account (your connection string).
PORT=3330
MONGODB_URL=mongodb://localhost:23568
Add the following to your config.js file:
require("dotenv").config()


module.exports = {
    PORT: process.env.PORT || 3330,
    MONGODB_URL: process.env.MONGODB_URL,
}
Before proceeding, we need to connect the app to our database (MongoDB). To do this, write the following in your mongoDb.js file:
const mongoose = require('mongoose');
const CONFIG = require('../Config/config');


const connectToDb = () => {
    mongoose.connect(CONFIG.MONGODB_URL)

    mongoose.connection.on("connected", () => {
        console.log("Connected to MongoDB Successfully");
    });

    mongoose.connection.on("error", (err) => {
        console.log("An error occurred while connecting to MongoDB");
        console.log(err);
    });
}

module.exports = {
    connectToDb
};
Now, we move on to creating the server with the home page. In your index.js file, type the following:
const express = require('express');
const bodyParser = require('body-parser');
const Database = require('./Database/mongoDb');
const CONFIG = require('./Config/config');

const app = express();

// connect to database
Database.connectToDb();

// Middleware
app.use(bodyParser.json());

app.use(express.json());

// Home Route
app.get('/', (req, res) => {
    return res.status(200).json({ message: 'Welcome to the World of Blogs!' })
})

// 404 Route
app.use('*', (req, res) => {
    return res.status(404).json({ message: 'Route not found' })
})

app.listen(CONFIG.PORT, () => {
    console.log(`Server started on http://localhost:${CONFIG.PORT}`)
})
Start the server by running the following command on your terminal:
$ node index.js
You should see the console messages for the successful starting of the server and the successful connection to your database. You can check the URL on a browser and you'll get to see the message for the home route.
Implementing CRUD Operations
Now that our server is up and running, we need to implement the CRUD operations that will enable us Create, Read, Update, and Delete blogposts. At this point, you will also need the Thunder Client extension (if you're using the VScode) or Postman for API testing. The CRUD operations will need a model to work with. The model houses the description of what a blogpost should be.
This is a sample of the model I used for each blogpost using mongoose package. You should install it via your terminal following the same pattern we used to install the previous packages and you'll see the details added to your package.json file. You can edit to your taste. Add these to the blogPostModel.js file:
const mongoose = require('mongoose');

//Define a schema
const Schema = mongoose.Schema;

//Enable blogpost ID
const BlogPostId = Schema.ObjectId;

//Define BlogPost Schema
const BlogPostSchema = new Schema({
    id: BlogPostId,
    title: {
        type: String,
        required: true,
        unique: [true, 'This title already exists!'] //validation with custom message
    },
    description: {
        type: String,
        required: true
    },
    author: {
        type: String,
        required: true
    },
    state:  {
        type: String,
        required: true,
        enum: ['draft', 'published'],
        default: 'draft'
    },
    read_count: {
        type: Number,
        default: 0
    },
    reading_time: {
        type: String,
    },
    image: {
        type: String,
    },
    imageDescription: {
        type: String,
    },
    tags: [String],
    blogPostBody: {
        type: String,
        required: true
    },
    createAt : {
        type: Date,
        default: Date.now
    },
    lastUpdateAt : {
        type: Date,
        default: Date.now
    },
});

// Export the model
module.exports = mongoose.model('BlogPosts', BlogPostSchema); //The name of the collection in the database is Blogs.
Now that we have a model, add the following to the blogPostController.js file to initiate the Create operation:
//Create a BlogPost
const createBlogPost = async (req, res) => {
    const body = req.body;
    const {firstname, lastname, email} = req.blogger;
    const readTime = await readingTime(req.body.blogPostBody);
    const author = `${firstname} ${lastname} ${email}`;
    const readCount = 0;

    try {
        const NewBlogPost = await BlogPostModel.create({
            ...body,
            author,
            read_count: readCount,
            reading_time: readTime.text,
        });
        return res.json({ status: true, NewBlogPost })
    } catch(err) {
        return res.json({status: false, error: err})
    }
};.'
Now to the blogPostRouter.js file, add the following:
const express = require('express');
const BlogPostController = require('../Controllers/blogPostController');

const blogPostRouter = express.Router();


blogPostRouter.post('/', BlogPostController.createBlogPost;

// Export the Router
module.exports = blogPostRouter;
You may be wondering how the route is different from the controller. The controller dictates the flow of each activity or operation on the API while the router chooses which controller is needed for each request to the API. To get this to work, we must add this router to the starting file, index.js via app.use() middleware function.
Add the following to the index.js file:
const BlogPostRouter = require('./Routes/blogPostRouter');

// Routes
app.use('/blogposts', BlogPostRouter);
Start the server again via your terminal and test the API using either the Thunder Client or the Postman. You should be able to create a blogpost after entering all the details stated in the blogPostModel.js.
You can now go ahead, following the example of the Create operation above to write the code for the Read (Get all BlogPosts, Get a BlogPost by ID), Update (Patch a BlogPost by ID), and Delete (Delete a BlogPost by ID)operations in the blogPostController.js with their respective routes clearly written in the blogPostRouter.js.
Authentication and Authorization
Let's move on to the users, whom I call Bloggers. Your API is like a house so you need to define who is allowed in and the extent to which each guest can exercise freedom (It is not everyone that can have access to your kitchen/bedroom). This is where authorization and authentication comes in . Out of the CRUD operations, most of the Read operations can be accessed by all while the Create, Update, and Delete operations can only be performed by authorised and authenticated users (bloggers). This involves implementing the sign i
First, we create a model for bloggers. This is a sample of my mongoose model. Now you'll need to install bcrypt to hash passwords in our database in case of any hack in the future. Add these to the bloggerModel.js file:
const mongoose = require('mongoose');
const bcrypt = require('bcrypt');

//Define a schema
const Schema = mongoose.Schema;

//Enable Blogger ID
const BloggerId = Schema.ObjectId;

//Define Blogger Schema
const BloggerSchema = new Schema({
    Id: BloggerId,
    firstname: {
        type: String,
        required: true
    },
    lastname: {
        type: String,
        required: true
    },
    email: {
        type: String,
        required: true,
        unique: [true, 'Email already exists!'] //validation with custom message
    },
    username: {
        type: String,
        required: true
    },
    password: {
        type: String,
        required: true
    },
    country: {
        type: String,
        required: false,
    }
});

// The code in the BloggerSchema.pre() function is called a pre-hook.
// Before the blogger information is saved in the database, this function will be called, you will get the plain text password, hash it, and store it.
BloggerSchema.pre(
  'save',
  async function (next) {
      const blogger = this;
      const hash = await bcrypt.hash(this.password, 10);

      this.password = hash;
      next();
  }
);

// You will also need to make sure that the blogger trying to log in has the correct credentials. Add the following new method:
BloggerSchema.methods.isValidPassword = async function(password) {
  const blogger = this;
  const compare = await bcrypt.compare(password, blogger.password);

  return compare;
}


// Export the model
module.exports = mongoose.model('Bloggers', BloggerSchema); //The name of the collection in the database is Bloggers.
Now in the Utils folder, add these to the authenticate.js file (You should install jsonwebtoken):
const jwt = require('jsonwebtoken');

// This function creates the authentication token for a blogger

const createToken = async (payload) => {
    try {
        const authToken = jwt.sign(
            payload, process.env.JWT_SECRET,
            { expiresIn: '1h' }
        );
        return authToken;
    } catch(err) {
        return err
    }
}

module.exports = createToken;
And to the authorization.js file, add these:
const jwt = require('jsonwebtoken');

const secretKey = process.env.JWT_SECRET;


// This function authenticates/verifies that the action to be carried out is legal and checks the validity of the token
const authorization = (req, res, next) => {
  const token = req.headers.authorization;
  if (!token) {
    res.status(401).send({ message: 'token is required!', status: false });
  } else {
    // checks if token matches the one provided at login
    const rightToken = token.split(' ')[1]; // Splits the token to reveal the blogger
    jwt.verify(rightToken, process.env.JWT_SECRET, (err, decoded) => {
      if (err) {
        res.status(401).send({ message: 'Authentication failed! Token is Invalid or expired. Please Login again', status: false });
      } else {
        req.blogger = decoded;
        next();
      }
    });
  }
};

module.exports = authorization;
We can now create the controller for bloggers to sign up or log in. Add the following to the authController.js file:
const BloggerModel = require('../Models/bloggerModel');
const createToken = require('../Utils/authenticate');

require('dotenv').config();

exports.signup = async (req, res) => {

    const bloggerExists = await BloggerModel.findOne({ email: req.body.email})
    if (bloggerExists) {
        return res.status(409).json({
            message: "Blogger exists, please sign in!"
        })
    }

    try {
        const blogger = await BloggerModel.create(req.body);
        const { firstname, lastname, email } = blogger;
        const token = await createToken({firstname, lastname, email})
        return res.status(201).json({
            message: 'Signup successful',
            blogger,
            token
        });
    } catch(err) {
        return res.json({status: false, error: err, message: "Something went wrong!"})
    }
}

exports.login = async (req, res) => {
    const { password } = req.body;
    try {
        const blogger = await BloggerModel.findOne({email: req.body.email});

        if (!blogger) {
            return res.status(400).json({ message: 'Blogger not found' });
        }

        const validate = await blogger.isValidPassword(password);

        if (!validate) {
            return res.status(401).json({ message: 'Wrong email or password, please re-enter your details' });
        }

        const { firstname, lastname, email } = blogger;
        const token = await createToken({firstname, lastname, email})

        return res.status(200).json({ message: 'Logged in Successfully', blogger, token });
    } catch (error) {
        return res.status(500).json(error);
    }
}
There is no need to export the entire model as we previously do since we have exported each operation. To set up the router, add these to the authRouter.js file:
const express = require('express');
const jwt = require('jsonwebtoken');
require('dotenv').config();


const AuthController = require('../Controllers/authController');

const authRouter = express.Router();

authRouter.post('/signup', AuthController.signup);
authRouter.post('/login', AuthController.login);

module.exports = authRouter;
To have these begin to function appropriately on our API, we need to add the following to our starting file, index.js:
const AuthRouter = require('./Routes/authRouter');

app.use('/',  AuthRouter);
Restart the server and test all the routes created for bloggers and blogposts.
Integration Testing
Integration testing is necessary to test the endpoints and also enable maintainability in the future by other developers. Mongoose, Supertest, Jest, and Mongodb-memory-server are packages you can use. You can see samples of the tests here.
Conclusion
Now we have a blogging API running. You can check here to see the remaining CRUD operations for the blogposts and how I implemented validators for blogposts and bloggers, and test the various endpoints. You will also get to see my Documentation (this is a brief about what the API contains and how to navigate through)for the API in the README.md file which is very important for developers to be able to consume your API (why bother to build an API if no one can use it?).
For Production, you can deploy your API to Heroku, Netlify, Render, or Firebase.